
Hello! I am Nicole Fuhrman, creator of Eva M Designs (named for my grandmother Eva Manko). I ended up on Etsy a few years ago after I decided I wanted to make jewelry. Making jewelry, however, branched out into ceramics, and then acrylic paints, and then chalkboards and magnets and coasters and pillows… You get the picture. Lately, I have been focusing on jewelry, and I ended up making this pair of earrings for a Secret Santa gift exchange at work. I figured it would be a great chance to get a little exposure for Eva M Designs and also give a super nice gift to a coworker! So instead of getting a $5 gift card to Starbucks (though I really did enjoy that Frappuccino!), our drama teacher got a nice $26 pair of earrings instead.
 In case anyone would like to replicate this pair, I’m going to share with you the process! It’s somewhat time consuming but fairly simple. First, you need to start with your set of pliers, bronze chain, bronze wire, and your glass pearls. You’ll have to tailor everything to the size of beads you use as well as the size of the chain links in order to get the same dangling effect, but the process is still the same.
Using your round nose pliers, curl the end of a peice of wire (you only need 2-3 inches, depending on the size of the bead) into a small circle. I use this technique in place of a head pin. I personally don’t like using headpins, because I’ve found the wire is often too difficult to bend and/or is not long enough to easily wrap. Plus my method is cost effective, and it automatically matches whatever color wire I’m using! String your center bead (the largest pearl) onto the wire, like so:

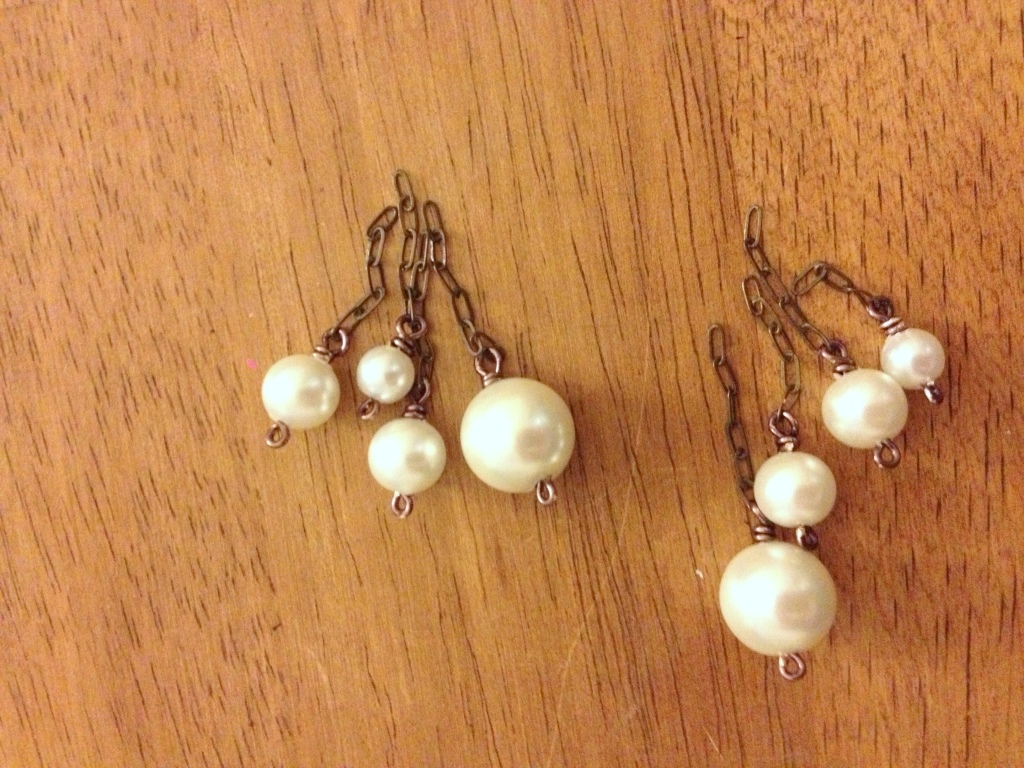
The first time I made these earrings, I wasn’t sure on the exact length of each pearl, so I always overestimate. I cut a chain of 7 or 8 links, and then I trimmed that down to 6 after I had the bead attached, as you can see in the picture above. So cut your chain to the length of links you would like, and then you can continue with the other end of the bead you have strung onto your homemade wire headpin. It is important to remember to attach the chain as you are wrapping the other end — I have forgotten before and have had to start over. By attaching the chain, this is what I mean:

Then, go ahead and wrap the end of the wire around the stem of the loop you just created. Hope that made sense!
At this point, you are repeating this process for as many pearls as you want in your cluster. I used one large, two medium, and one smaller for my cluster. I generally prefer asymmetry, but feel free to add a second smaller bead. After you have strung your pearls on chains, like this:
 It is time for you to make your ear wires. Now, the first time I made these, I made the mistake I was telling you about — not remembering to string my chains on BEFORE I finished. So now I have a set of bronze earring hooks with nothing on them:
Don’t do that! First, wrap your wire around your round-nosed pliers. Before finishing the loop by wrapping the wire around its stem, string on your chains in whatever order you think falls best. I used: medium bead, large bead, medium bead, and small bead. THEN, finish the loop by wrapping the end of the wire around the loop’s stem. So now you have a wire that ends in a loop with your dangling chains. To shape the ear hook, you are going to bend the wire around a round rod — I use a colored pencil, although you could also use a screwdriver.
Align the pencil to the bottom of the loop, then bend the wire over the pencil. Clip the wire below the loop, and using your round-nosed pliers, flip out the very tip of the wire. To smooth that jagged end of the wire, use a wire rounder.
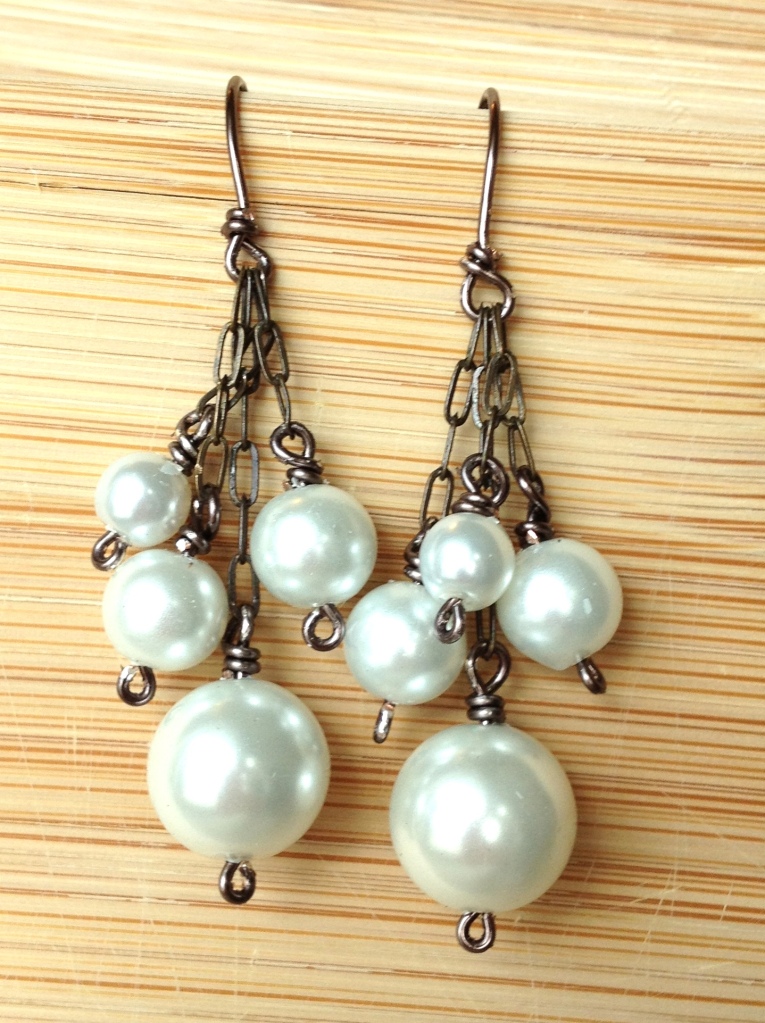
And ta-da! You have lovely new earrings:
Wow! I love these!!!
Stay with us because tonight the link up begins and therefore the challenge is on. Be the first to link up this week and WIN an………
Wait for it…………
Win a $25 gift card from Etsy!
Get ready! The link up is coming later tonight!