I’m so excited to be here at CSI! I’m even more excited to share my love of photography with all of you. Many of you may know me from Home Ec. with Mel but, I also have a small photography business with my husband. We specialize in senior portraits and performance photography. Today, we are going to briefly cover the two main file types in photography and then how to save those files for different purposes.
Let’s talk for a minute about file types and sizes. If you are using a point & shoot camera or a cell phone camera then your photos are automatically saved as jpg or JPEG. If you have a DSLR camera you have the choice between jpg or RAW. RAW files are going to be larger files while jpg files are much smaller. The easiest way to explain the difference in shooting RAW vs. jpg is to explain it using a film camera. If you shoot in RAW it’s like developing your own photos in your own darkroom while, shooting in jpg is like taking the photos and dropping them off for the lab to do it. I have a 12 megapixel DSLR camera for the photo below the RAW file was 14.6 megabytes while the jpg is 7.4 megabytes. HUGE difference huh? Well the one on this page is 67 kilobytes. Why the difference and why three different files for one photo? Continue reading after the photo.

RAW files are great in my opinion. I love having the control of what the finished product will look like. Since the file is so large, it is considered a lossless format there is a ton of information that I have to correct color and bring out details or to get really artsy. Jpg files are smaller, they are considered lossy files, because all of the unneeded information has been discarded either by the camera or by the user. This is where our lesson begins. Take notes, bookmark this, pin it, whatever you need to do be able to find it later.
First you need a file structure of some type. Trust me, if you want to be able to easily find your photos it’s worth the time and effort to set one up.

My base file structure
My RAW files go into a folder named Raw_Photos. Inside that folder I have the year and inside of the year folder is the date that the photo was taken on. I use Lightroom to transfer my photos from my card and on to my hard drive*. This ensures that my original RAW file is safe from harm.
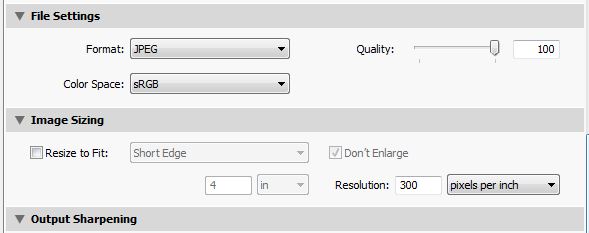
Once I’m done working on the photo I save it, export in Lightroom, as a full size file I make sure my resolution is 300. I also save it into a folder by the theme (i.e. floral, nature, or my company name), and then by the shoot. This is my full sized, high resolution, printable file. If someone purchases one of my art prints this is the file I use, if a magazine contacts me to use a photo in print this is the file I go to, this one is NOT the one that is seen on Facebook or my blogs. I do upload this file to Flickr because I have it set that no one can download my files without me granting permissions.
(*I do not use the internal hard drive of my computer. I have a networked external hard drive that is available to all the computers in my home.)
Now to make a web ready version of the same file. Since I have written an action for Photoshop to do the work for me that’s where I open my files at. By all means though do this where you normally add your watermark at, Photoshop, Lightroom, or an online program. I go to the folder where I saved the full size file and make a new folder in there titled web. It’s in that folder that I save my small file with my watermark and I save it with descriptive words if I’m using it in a blog. The example I posted here I left it as img_4259 but if I was going to blog about the event that the photo was from it would have been cyreigna_irie_tribal_tap_gala. I have the performer, the troupe, and the event. An image on my blog might be gluten_free_snickerdoodles or bleach_tshirt_lucky. Use keywords when saving your web images so that they’ll get picked up by search engines.
You may be asking why I go to all this work. I use RAW files because I like the control I have on how they are developed. I ensure that I have a full size file for many reasons. If I need or want to print it the file is large enough to do that. If someone wants to purchase a print I can do so, up to a 36×48. (No one has ever purchased a print that large they are very expensive, but I can if someone does.) Most importantly in the craft blogging business if a magazine wants to use my photos I don’t have to scramble to figure out how to get a photo big enough for them to use. I make the web version to protect myself and/or my client. The image of Cyreigna is watermarked, which provides a level of security but isn’t enough. The image is also small enough that it can’t be printed but still looks good online.